
oakbydesign
01423 593 794

The amount of work needed to clear the inside of the barn was more than we expected; much more. For a team of labours, no problem, but Sarah and I, well, we wanted to look back and say, we did this!
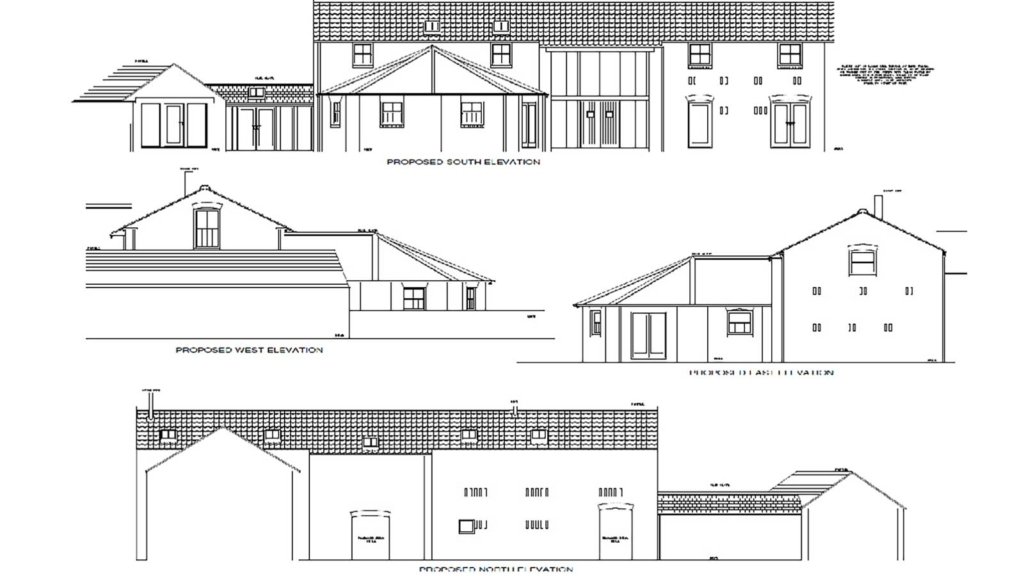
We knew the earth floor had to be removed but was unsure how or what to replace it with. We enlisted the help of a structural engineer. He was on hand to provide advice on the sub floor, its design and makeup. He also advised on any oak beams we wanted to introduce and the roof structure in its entirety. The barn conversion would have vaulted ceiling upstairs adn consist of 7 feature oak roof trusses.
We were advised the barn would need a couple of trial holes near the base of the building to establish if there were any footings. From here, we could decide whether underpinning was necessary and the condition of the ground beneath. We found approx. 800mm of footings or existing brickwork continuing below the ground, sufficient not to underpin, a costly exercise we did not really need or want.
The floor would be dug out to a depth where a replacement layer of hardcore and concrete would create a raft like structure at the required height for the two-storey build. The barn conversion had a restriction that meant we were not allowed to increase the height of the original build. This proved difficult to calculate allowing suffice head height on both the ground and first floors. We learnt about walls plates, depths of screed, the amount of insulation required and other dimensions to allow us sufficient headroom on both levels.
With the levels calculated, the whole team, well, Sarah and I, got to work. The barn contained some old wooden boxes, a rotten staircase and several old tractor parts completely beyond use. Our barn conversion was also home to many hundreds of pigeons and it’s plain to say, it felt like grime busters of the TV. We decided to hire a small mini digger and dumper to speed the process up.

Now feeling like ‘proper’ builders, the barn conversion tok shape by stripping the inside to create a bare shell from which to work. It was towards the end of March and the weather was average for the time of year. We seemed to progress well as a team, myself controlling the new toy digger and Sarah struggling with the rear wheel steering of the dumper.
Suddenly, above the noise of the engines, Sarah shouted “Snake, I’ve found a snake!” As the typical man, I thought Sarah may have stumbled across a larger than average worm and decided to investigate. Sarah seemed serious, very serious. So, now armed with pick axe and a rescued dustbin lid, looking like a gladiator from the similarly named film, I progressed slowly towards the creature. Sure enough, a small snake laid there, tasting the air with its forked tongue.
I quickly changed what seemed, slightly exaggerated weapons, to a spade and clean container. We guided the snake carefully into its temporary home and later had it identified as a common grass snake by a local pet shop. They kept it in for observation and would release it later when the weather got better. The joys of a barn conversion!
Whilst clearing the barn, we unearthed some clay floor bricks and these were put to one side to be reused later. It had taken just over three weeks to fully clear the barn, remove the subsoil and create a cavern like opening ready for the concrete slab. The barn conversion now had a blank canvas.

It was the Saturday night of Easter when we received a call from York’s fire brigade. We were fortunate to live only seven miles away but the time it took to reach to barn seemed to take forever. We had been told ‘your barn has collapsed and it needs attention now!”
We had no idea as to the extent of the damage or how much, if any, of our beatiful barn conversion remained. We arrived at the entrance to blue flashing lights and ‘do not cross’ blue tape used at police incidents. Also present were the council, as a bridle way ran alongside the drive and firemen using thermal imaging equipment to search for possible bodies under the rubble. Nobody knew if children had been on site and the gable end looked very unsteady. Our barn conversion destroyed in a few seconds.
Looking optimistically, only half of the barn had collapsed. We had no roof, although we would have had to replace this anyway, some walls and all the debris would need to be removed again. At this point, the dream of completing a barn conversion seemed never ending task.
We later found out the reason for the collapse. A tie beam in one of the existing pine trusses had a rotten end. These roof trusses were load-bearing, meaning they held up the entire roof. We were extremely fortunate not to be working at the time and thankfully, no-one was hurt.

The walls would have to be rebuilt.
As the barn was built using a rare two inch (50mm) handmade reclaim brick from the 19th Century, the decision was made to integrate a new, but old looking, brick in to the mix..
Although currently no longer available, we used a personally designed and manufactured brick from Belgium. It incorporated all the right features and colours associated with a reclaim brick making a near seamless transition between old and new.
Bricklaying was one of those trades that is made to look easy. We employed a local bricky and we laboured alongside him. The brick match was good and coupled with using a lime-based mortar, the result would be more than acceptable. The walls were gradually rebuilt and window openings positioned accordingly.

The same bricks had to be used on the ‘wheelhouse’ as this section of the building contained no footings and a complete rebuild was necessary. The ‘wheelhouse’ was to become the barn conversions main feature, the kitchen, a single storey with impressive vaulted ceiling with exposed oak roof trusses. Having now mastered, well enjoyed, using the mini digger so much, I calculated the footprint of the six-sided kitchen and dug the footings after a very amenable and friendly conversation with our local building inspector.
After ordering the sand, lime, cement, insulation, blocks, wall ties and our very own two-inch handmade bricks, we started the building aspect of this conversion. Two months had passed and it seems we hadn’t got anywhere. As we were at the barn most days, you do not see the progress you make.
The month of April and first week of May had seen the barn conversion transform. After the collapse, we re-cleaned the site and installed the internal drainage. The pipes were laid to accommodate three upstairs toilets (two ensuite) and the downstairs cloakroom off the main hallway.
These were laid at an incline to ensure all waste water runs into the inspection chamber located outside. This was a long job as we had to core drill 4 holes through 350mm of brickwork and due to the angle of the hole and its location, the four holes took over 4 hours to complete.
A damp-proof membrane or Visqueen barrier was laid over the now sandy floor and was seated into the deepened trench around the perimeter of the barn for the inner skin of block work. The barn conversion would retain most of the outer brick skin and be tied to aninternal breeze block wall.
Looking back at the first picture we took; we could see the progress and to date were ahead of schedule and under budget. The block work was started, together with some internal exposed brickwork we intended to have in various areas around the barn.
After raking in help from two of our staff and our trusted bricky John, we ordered 22 cubic meters of concrete. All of which had to be laid in one afternoon! Having never done this before, the learning curve was steep, but worth it.
With wheelbarrows at the ready and a good system in place, the concrete flowed and made a tremendous difference to the whole feel of the barn.
It was June and it had got to the ‘are we getting anywhere’ stage. It was true to say that all the hard work in preparing the ground-works, footings and drains are not normally appreciated, as most of this is covered up with hardcore or concrete.

In early October and although on budget, the project had slowed significantly due to bad weather and time spent back at Oak By Design. As previously mentioned, the forgotten cost for scaffolding raised its head when John the bricklayer jokingly asked if we still wanted a two-storey building! At this stage we also needed to forward think about the roof and the 7 structural oak trusses!
Telephone: 01423 593 794
Locksley Park
Blind Lane
Tockwith
YORK YO26 7QJ
Opening Times:
Mon to Fri - 9.00am to 5.00pm
Bank Holidays - Closed
Christmas 2025- TBC
Oak By Design is the trading name of:
Oak By Design Ltd.
Reg Number: 04384416
VAT Number: 664 8012 33