oakbydesign
01423 593 794


Installation of RSJ oak covers is normally a two or more person job. This depends on the length, location and dimension of the cover.
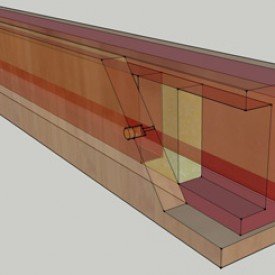
Working on the drawings shown, there is a need to secure noggins (pieces of softwood) between the top and bottom flanges of the RSJ.
These can be set at 800mm centres along each side down the length of the cover. Ideally, another noggin should be placed at the ends. Important: mark the location of these noggins on the ceiling, as they won’t be visible when the oak cover is guided into place.
Every RSJ oak cover comes with a specially shaped drill bit and matching oak pellets. This drill bit is used to create a hole in the side of the cover to accommodate a suitable screw.
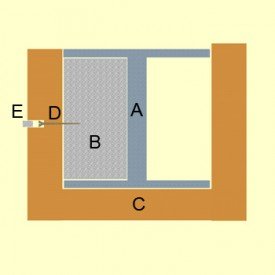
The head of the installed screw is then disguised with the oak pellet, as shown in the diagram on the left-hand side. Align the grain on the pellet to match that shown in the oak cover. This pellet can be left as a feature or chiselled flat and coloured using the supplied matching wax stain.


Looking at the side view drawing.
(A) – This would be the RSJ, an old beam or anything else you might need to cover.
(B) – This is called a noggin (a normal piece of softwood to fix the screw to) – this may not be needed if you are attaching to something you can screw into.
(C) – This is your perfectly designed, shaped and finished RSJ cover – it can be 2 sided (in an L shape) if needed.
(D) – This is a suitable screw used to secure the cover to the noggin or existing beam.
(E) – This is an oak pellet (provided) to disguise the hole you have drilled in the side of the cover.
Telephone: 01423 593 794
Locksley Park
Blind Lane
Tockwith
YORK YO26 7QJ
Opening Times:
Mon to Fri - 9.00am to 5.00pm
Bank Holidays - Closed
Christmas 2025- TBC
Oak By Design is the trading name of:
Oak By Design Ltd.
Reg Number: 04384416
VAT Number: 664 8012 33